How Can I Read Ble Characteristics All the Time
The ESP32 comes non only with Wi-Fi but besides with Bluetooth and Bluetooth Low Free energy (BLE). This mail is a quick introduction to BLE with the ESP32. First, we'll explore what's BLE and what it can exist used for, and then we'll accept a look at some examples with the ESP32 using Arduino IDE. For a unproblematic introduction we'll create an ESP32 BLE server, and an ESP32 BLE scanner to notice that server.
Introducing Bluetooth Low Free energy
For a quick introduction to BLE, you can picket the video below, or you tin can scroll downwards for a written explanation.
Recommended reading: learn how to use ESP32 Bluetooth Classic with Arduino IDE to exchange data between an ESP32 and an Android smartphone.
What is Bluetooth Low Energy?
Bluetooth Depression Energy, BLE for short, is a ability-conserving variant of Bluetooth. BLE's primary application is short distance manual of small amounts of data (low bandwidth). Different Bluetooth that is always on, BLE remains in sleep manner constantly except for when a connection is initiated.
This makes it consume very depression ability. BLE consumes approximately 100x less ability than Bluetooth (depending on the use case).

Additionally, BLE supports not merely point-to-signal communication, but also broadcast mode, and mesh network.
Take a expect at the table below that compares BLE and Bluetooth Classic in more detail.

View Paradigm Souce
Due to its backdrop, BLE is suitable for applications that need to exchange small amounts of information periodically running on a coin jail cell. For example, BLE is of swell use in healthcare, fitness, tracking, beacons, security, and home automation industries.

BLE Server and Customer
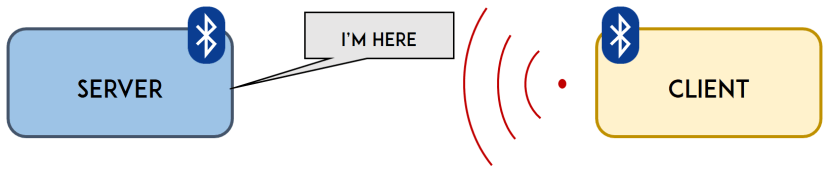
With Bluetooth Depression Energy, there are two types of devices: the server and the client. The ESP32 can act either as a customer or as a server.
The server advertises its being, so it can be found by other devices, and contains the data that the client can read. The customer scans the nearby devices, and when it finds the server it is looking for, it establishes a connection and listens for incoming data. This is called betoken-to-bespeak advice.
As mentioned previously, BLE also supports broadcast mode and mesh network:
- Broadcast mode: the server transmits data to many clients that are connected;
- Mesh network: all the devices are connected, this is a many to many connection.
Even though the broadcast and mesh network setups are possible to implement, they were developed very recently, so there aren't many examples implemented for the ESP32 at this moment.
GATT
GATT stands for Generic Attributes and it defines an hierarchical data structure that is exposed to connected BLE devices. This means that GATT defines the way that 2 BLE devices send and receive standard messages. Understanding this hierarchy is important, because it will get in easier to understand how to use the BLE and write your applications.

BLE Service
The summit level of the hierarchy is a profile, which is composed of one or more services. Ordinarily, a BLE device contains more than one service.
Every service contains at least ane characteristic, or tin can besides reference other services. A service is simply a drove of information, like sensor readings, for example.
There are predefined services for several types of data defined by the SIG (Bluetooth Special Interest Group) similar: Battery Level, Blood Pressure level, Heart Rate, Weight Scale, etc. Y'all can bank check here other divers services.

View Paradigm Souce
BLE Characteristic
The characteristic is ever endemic by a service, and it is where the actual information is contained in the hierarchy (value). The characteristic always has two attributes: characteristic declaration (that provides metadata about the information) and the characteristic value.
Additionally, the characteristic value tin can exist followed by descriptors, which further expand on the metadata contained in the characteristic declaration.
The properties describe how the feature value tin can be interacted with. Basically, it contains the operations and procedures that can be used with the characteristic:
- Broadcast
- Read
- Write without response
- Write
- Notify
- Point
- Authenticated Signed Writes
- Extended Properties
UUID
Each service, characteristic and descriptor have an UUID (Universally Unique Identifier). An UUID is a unique 128-flake (16 bytes) number. For example:
55072829-bc9e-4c53-938a-74a6d4c78776
There are shortened UUIDs for all types, services, and profiles specified in the SIG (Bluetooth Special Interest Group).
But if your application needs its own UUID, you lot can generate it using this UUID generator website.
In summary, the UUID is used for uniquely identifying information. For example, information technology can identify a particular service provided by a Bluetooth device.
BLE with ESP32
The ESP32 tin act as a BLE server or as a BLE client. There are several BLE examples for the ESP32 in the ESP32 BLE library for Arduino IDE. This library comes installed by default when y'all install the ESP32 on the Arduino IDE.
Note: Y'all need to take the ESP32 add-on installed on the Arduino IDE. Follow one of the adjacent tutorials to prepare your Arduino IDE to work with the ESP32, if you haven't already.
- Windows instructions – ESP32 Board in Arduino IDE
- Mac and Linux instructions – ESP32 Lath in Arduino IDE
In your Arduino IDE, you tin can get toFile > Examples > ESP32 BLE Arduino and explore the examples that come with the BLE library.

Note: to run into the ESP32 examples, you must have the ESP32 lath selected onTools >Board.
For a brief introduction to the ESP32 with BLE on the Arduino IDE, we'll create an ESP32 BLE server, and then an ESP32 BLE scanner to find that server. We'll use and explain the examples that come with the BLE library.
To follow this instance, you demand two ESP32 evolution boards. We'll be using the ESP32 DOIT DEVKIT V1 Board.
ESP32 BLE Server
To create an ESP32 BLE Server, open up your Arduino IDE and get toFile > Examples > ESP32 BLE Arduino and select the BLE_server case. The post-obit code should load:
/* Based on Neil Kolban instance for IDF: https://github.com/nkolban/esp32-snippets/hulk/master/cpp_utils/tests/BLE%20Tests/SampleServer.cpp Ported to Arduino ESP32 by Evandro Copercini updates past chegewara */ #include <BLEDevice.h> #include <BLEUtils.h> #include <BLEServer.h> // Encounter the post-obit for generating UUIDs: // https://www.uuidgenerator.cyberspace/ #define SERVICE_UUID "4fafc201-1fb5-459e-8fcc-c5c9c331914b" #define CHARACTERISTIC_UUID "beb5483e-36e1-4688-b7f5-ea07361b26a8" void setup() { Serial.begin(115200); Series.println("Starting BLE work!"); BLEDevice::init("Long name works now"); BLEServer *pServer = BLEDevice::createServer(); BLEService *pService = pServer->createService(SERVICE_UUID); BLECharacteristic *pCharacteristic = pService->createCharacteristic( CHARACTERISTIC_UUID, BLECharacteristic::PROPERTY_READ | BLECharacteristic::PROPERTY_WRITE ); pCharacteristic->setValue("Hello World says Neil"); pService->offset(); // BLEAdvertising *pAdvertising = pServer->getAdvertising(); // this withal is working for backward compatibility BLEAdvertising *pAdvertising = BLEDevice::getAdvertising(); pAdvertising->addServiceUUID(SERVICE_UUID); pAdvertising->setScanResponse(true); pAdvertising->setMinPreferred(0x06); // functions that help with iPhone connections issue pAdvertising->setMinPreferred(0x12); BLEDevice::startAdvertising(); Serial.println("Characteristic defined! At present y'all can read information technology in your telephone!"); } void loop() { // put your main code here, to run repeatedly: filibuster(2000); } View raw lawmaking
For creating a BLE server, the code should follow the next steps:
- Create a BLE Server. In this case, the ESP32 acts as a BLE server.
- Create a BLE Service.
- Create a BLE Characteristic on the Service.
- Create a BLE Descriptor on the Feature.
- Start the Service.
- Start advert, so it can be found by other devices.
How the code works
Let'southward take a quick expect at how the BLE server example lawmaking works.
It starts by importing the necessary libraries for the BLE capabilities.
#include <BLEDevice.h> #include <BLEUtils.h> #include <BLEServer.h> And so, you lot need to define a UUID for the Service and Characteristic.
#define SERVICE_UUID "4fafc201-1fb5-459e-8fcc-c5c9c331914b" #define CHARACTERISTIC_UUID "beb5483e-36e1-4688-b7f5-ea07361b26a8" You tin can leave the default UUIDs, or you can get to uuidgenerator.internet to create random UUIDs for your services and characteristics.
In the setup(), information technology starts the series communication at a baud rate of 115200.
Serial.brainstorm(115200); And then, you create a BLE device called "MyESP32". You can change this name to whatever y'all like.
// Create the BLE Device BLEDevice::init("MyESP32"); In the following line, yous set the BLE device as a server.
BLEServer *pServer = BLEDevice::createServer(); After that, you lot create a service for the BLE server with the UUID defined earlier.
BLEService *pService = pServer->createService(SERVICE_UUID); Then, you set the characteristic for that service. As you can run into, y'all as well employ the UUID defined earlier, and you need to pass as arguments the characteristic's backdrop. In this instance, it's: READ and WRITE.
BLECharacteristic *pCharacteristic = pService->createCharacteristic( CHARACTERISTIC_UUID, BLECharacteristic::PROPERTY_READ | BLECharacteristic::PROPERTY_WRITE ); After creating the feature, y'all can set its value with the setValue() method.
pCharacteristic->setValue("Hello World says Neil"); In this case we're setting the value to the text "Hello World says Neil". You lot can change this text to whatever your like. In future projects, this text can be a sensor reading, or the country of a lamp, for example.
Finally, you can commencement the service, and the advertizement, so other BLE devices tin scan and find this BLE device.
BLEAdvertising *pAdvertising = pServer->getAdvertising(); pAdvertising->start(); This is just a simple example on how to create a BLE server. In this code naught is done in the loop(), but you can add together what happens when a new client connects (bank check the BLE_notify example for some guidance).
ESP32 BLE Scanner
Creating an ESP32 BLE scanner is elementary. Grab another ESP32 (while the other is running the BLE server sketch). In your Arduino IDE, go toFile > Examples >ESP32 BLE Arduino and select the BLE_scan example. The following code should load.
/* Based on Neil Kolban case for IDF: https://github.com/nkolban/esp32-snippets/blob/master/cpp_utils/tests/BLE%20Tests/SampleScan.cpp Ported to Arduino ESP32 by Evandro Copercini */ #include <BLEDevice.h> #include <BLEUtils.h> #include <BLEScan.h> #include <BLEAdvertisedDevice.h> int scanTime = 5; //In seconds BLEScan* pBLEScan; course MyAdvertisedDeviceCallbacks: public BLEAdvertisedDeviceCallbacks { void onResult(BLEAdvertisedDevice advertisedDevice) { Serial.printf("Advertised Device: %s \n", advertisedDevice.toString().c_str()); } }; void setup() { Serial.begin(115200); Serial.println("Scanning..."); BLEDevice::init(""); pBLEScan = BLEDevice::getScan(); //create new scan pBLEScan->setAdvertisedDeviceCallbacks(new MyAdvertisedDeviceCallbacks()); pBLEScan->setActiveScan(truthful); //active scan uses more ability, but get results faster pBLEScan->setInterval(100); pBLEScan->setWindow(99); // less or equal setInterval value } void loop() { // put your main code here, to run repeatedly: BLEScanResults foundDevices = pBLEScan->start(scanTime, fake); Series.impress("Devices institute: "); Serial.println(foundDevices.getCount()); Serial.println("Scan done!"); pBLEScan->clearResults(); // delete results fromBLEScan buffer to release retentiveness filibuster(2000); } View raw code
This code initializes the ESP32 equally a BLE device and scans for nearby devices. Upload this code to your ESP32. Yous might want to temporarily disconnect the other ESP32 from your computer, so you're sure that y'all're uploading the code to the correct ESP32 board.
Once the code is uploaded and you should have the two ESP32 boards powered on:
- One ESP32 with the "BLE_server" sketch;
- Other with ESP32 "BLE_scan" sketch.

Get to the Serial Monitor with the ESP32 running the "BLE_scan" instance, press the ESP32 (with the "BLE_scan" sketch) ENABLE push to restart and wait a few seconds while information technology scans.

The scanner found ii devices: one is the ESP32 (information technology has the name "MyESP32), and the other is our MiBand2.

Testing the ESP32 BLE Server with Your Smartphone
Most modernistic smartphones should have BLE capabilities. I'k currently using a OnePlus five, but most smartphones should too work.
You can scan your ESP32 BLE server with your smartphone and see its services and characteristics. For that, we'll be using a free app callednRF Connect for Mobile from Nordic, it works on Android (Google Play Store) and iOS (App Store).
Go to Google Play Store or App Shop and search for "nRF Connect for Mobile". Install the app and open information technology.

Don't forget go to the Bluetooth settings and enable Bluetooth adapter in your smartphone. You may besides want to brand it visible to other devices to exam other sketches later on.

Once everything is ready in your smartphone and the ESP32 is running the BLE server sketch, in the app, tap the browse button to scan for nearby devices. Yous should detect an ESP32 with the name "MyESP32".

Click the "Connect" button.
As you can run across in the effigy below, the ESP32 has a service with the UUID that you've divers earlier. If you tap the service, information technology expands the menu and shows the Feature with the UUID that you've likewise defined.

The characteristic has the READ and WRITE properties, and the value is the one you've previously defined in the BLE server sketch. So, everything is working fine.
Wrapping Up
In this tutorial we've shown you the basic principles of Bluetooth Low Free energy and shown you some examples with the ESP32. Nosotros've explored the BLE server sketch and the BLE scan sketch. These are uncomplicated examples to go yous started with BLE.
The idea is using BLE to send or receive sensor readings from other devices. Nosotros'll exist posting more tutorials and projects most BLE with the ESP32, so stay tuned!
This is an excerpt from our course: Acquire ESP32 with Arduino IDE. If you lot like ESP32 and y'all want to learn more nigh information technology, we recommend enrolling in Acquire ESP32 with Arduino IDE course.
You lot might also similar reading:
- Acquire ESP32 with Arduino IDE
- ESP32 Bluetooth Classic with Arduino IDE – Getting Started
- ESP32 Information Logging Temperature to MicroSD Carte
- ESP32 with DC Motor and L298N Motor Commuter – Control Speed and Direction
Thanks for reading.
Updated May 16, 2019
How Can I Read Ble Characteristics All the Time
Source: https://randomnerdtutorials.com/esp32-bluetooth-low-energy-ble-arduino-ide/
0 Response to "How Can I Read Ble Characteristics All the Time"
Post a Comment